Thursday, May 29, 2014

Buttermilk Pound Cake II


Yet again, I used up another four tablespoons of buttermilk.

I didn't just want to - I had to.


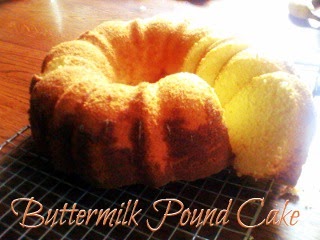
It was beautiful. Much better than the first attempt made by Mom.


It was supposedly my fault because I greased the cake pan. Apparently I didn't grease it enough?

This time, I greased furiously.


Fortunately, it worked.


I used a recipe from allrecipes. Personally I think there were too much eggs.


My cake looks yellower than the one on the website. My guess is because I didn't use vanilla extract. [What is so amazing about vanilla extract anyway? What happened to chocolate extract?] I used two teaspoons of lemon extract. Hmm. Had I used orange extract... or even strawberry extract... or blackberry...
Next try: Try a different extract and see if it changes anything else besides the color.

I had trouble taking the cake out of the pan. Probably because I greased the pan, but didn't flour it.
Next try: Grease AND flour the pan. Think of it as putting lotion on, and then baby powder.

When I put the cake inside the oven, only part of it was baked. One side was left yellow and soft. I think this is because I placed the pan too close to the oven door.
Next try: Push it farther into the oven. >:D

I had the powder type buttermilk. I measured four tablespoons of it and measured a cup of water. I wonder what would happen if I mixed the buttermilk powder with the water.
Next try: Mix buttermilk powder with water. >:D

Eggs, buttermilk, baking powder, lemon extract, butter, salt, and water.
Bundt pan, sugar, and flour.
So, when I came to part where I had to mix the buttermilk alternately with the dry ingredients, I accidentally poured the water inside the mixing bowl - all of it.

IT WAS SUPPOSED TO BE ALTERNATELY.

I regretted the moment and wanted to rewind, but I continued pouring in the dry ingredients. Make mistakes and learn they say.


Fortunately it made no impact on the cake. If I'd been using liquid buttermilk I probably would have failed. Woot for powder buttermilk!

Beautifully greasy butter wrapper. Time to grease!
Now that that's greased, we combine the flour, baking soda, and salt. If you're using powder buttermilk, put that in too.
Now cream the butter with the sugar.


Mix in the eggs one at a time, and beat well after each addition.

Then stir in the extracts.
The oven's done. How long did it take?
Alternately mix in the flour with the buttermilk.
Then pour the mixture into your cake pan and place it generously in the prepared oven. Set the timer for an hour and thirty minutes.

 And after an hour and thirty minutes, open the oven to reveal... voila!!


-N-

[Q&A] Parchment vs Wax


I always did wonder what the difference was, other than the texture.

WHAT IS THE FUNCTION OF PARCHMENT PAPER AND WAX PAPER IN PREPARING BAKING PANS/SHEETS? WHICH ONE IS BETTER TO USE?

Parchment
It's great for making sure cookies don't stick to the sheet. You don't even need to become a butterfingers - forget the leftover butter wrapper! Parchment paper is also more reliable than regular greasing. Remember my Everyday Chocolate Cake #epicfail? On the first attempt, we used parchment paper. The cake was easy to pull out of the pan and there was no knife needed. Whereas, when I tried greasing, the four corners were not greased and cake stuck to them hilariously. Also, flour stuck to the cake from the greasing, therefore rendering the cake a rather non-professional appearance.

One time, Mom was making gluten free snickerdoodle cookies for Little Bro Z. I asked mom a question about parchment paper I think, and she said, "Look, you can just easily peel the cookie off!"

Truth be told, 'twas true.

Parchment paper is much more papery than wax paper. 

HOWEVER, the thing about parchment paper is that it can't be reused. I mean, it can be used again for another batch of cookies, but when all the batter is finished and you're done baking for the day, you throw the parchment paper away. Right? Well, by using butter wrappers, you're doing the cows and farmers a favor in reusing the butter wrapper. They'd love to know that their elbow grease came to use.

Wax
It's waxy.

Wax, oven, hot, fire, burning... is there any connection?

Parchment paper is chosen over wax paper, usually. Apparently, wax paper burns in the oven and so, it's not a good choice for baking. If you search 'wax paper' on Google images, you'll find more craftsy stuff instead of baking stuff. If you search parchment paper, you'll see annoying scrolls (XD) and lined baking pans. Therefore, wax paper isn't really the guy you need for baking.

 Wax paper burns more easily. It's more slippery. Easier for you to hurt your finger when ripping it out of the container.

HOWEVER, wax paper is good for lining cake pans, as long as it isn't exposed! It can also be used for tiny treats, like truffles or candy apples. Wax paper is water-resistant. Just tape it to your table and you can roll out your dough pretty easily. Wax paper is ideal for storing food, but it is not ideal for baking. If you use it in baking and the oven is at a high temperature, the wax will melt and sink into whatever you are baking. Nasty.

--

So, whenever baking, please refer to parchment. It's highly recommended.

Sorry, wax paper.

-N-

Wednesday, May 28, 2014

Keep Calm and Keep Safe

The key to fun & easy baking is kitchen safety. Right?

Click for enlargement.
Make sure your hands are always CLEAN.
That's what they all say. Right? It makes sense anyways. Less stressful too, in a way.

Wash all eggs before use.
Why? They did come out of a hen's butt, you know. And landed into a straw nest stained with hen turds, most likely. #amiright

Don't leave pots and/or pans on the stove with the fire on.
For one thing, the pot will burn.
For another thing, you'll be yelled at. (That is if you're under supervision.)

Wear appropriate clothing.
No loose long-sleeved shirts.
Also, if your hair is long, tie it up, or somehow keep it out of the way. If your hair is falling over your face while you're cooking over a fire... well... now do you know why lunch ladies wear hairnets?

Don't leave spoons or ladles in cooking pots. 
The heat from the pot will get the spoon/ladle hot, therefore rendering the spoon/ladle impossible to hold.

When cooking something on the stove, turn the pot's handle inward.
In case you like to dance while waiting for something to heat up/melt, you'd better keep the pot's handle out of the way. Or else.... *dancing arm smashes down on sticking-out pot handle* *BOOM* *hot liquid spills all over your feet* *ow*

Don't get any wires, plugs, or outlets wet.
Unless you think electrocution is electrocute.

Clean up spills immediately.
YES, mother... *picks up rag*

Be careful when cutting things that are hard, tiny, or slippery. (onions, rock-hard, baking chocolate, nuts)
I one time was cutting an onion. It was annoying and slippery and refused to be cut. The knife slipped and cut my finger.
Another time, I was cutting chicken. It wouldn't cut. I slowly increased the knife's pressure, and then my left pinkie got cut. It was so fast and the pain was so strange. I grabbed my pinkie, and squeezed it in fear. When I slowly opened my hand, there was a deep white cut in my pinkie. The blood was coming fast. I got all sweaty. I got all weak. I got all limp. Weak from shock. Limp from blood loss. I ran to the bathroom and got a band-aid. What if I got infected? The knife was covered in chicken juice. And probably chicken farts too. By the way, the injury is still on my finger for those who want to see.

Try your best not to open bags/packets with knives. (It's not so cool once you get injured!)
I never got injured while doing this, but it's possible to. I was once cutting open a potato sack with a knife. The blade got stuck in all those potato-sack fiber string things, and I couldn't pull out the knife. If I'd pulled it out really hard, the knife would've flown into the air, floated for a few seconds, then come swirling down on my head.

And unless you like having a pained tummy, don't eat the cake batter or cookie dough. Please.

Source(s): http://www.straighten-up-now.com/kitchen-safety-tips.html

-N-

Tuesday, May 27, 2014

[Q&A] Separation, Room Temperature, and Preheating

How come eggs and butter need to be at room temperature? Does the temperature really make a difference? Why do I have to preheat the oven before the whole mixing process?


If those questions have ever struck your mind when you bake, then we're in the same boat. I wondered about these things too, and I haven't found an answer until now. Here are some answers to your questions along with the reasons.


WHY DO SOME INGREDIENTS NEED TO BE AT ROOM TEMPERATURE?
Well, obviously, butter needs to be at room temperature for successful and stress-free baking. A cold or almost froze-to-the-bone stick of butter may cause annoying problems when you're trying to mix your ingredients together. The butter in the mixing bowl (if you are using an electric mixer) will act like an unwanted rock and the mixer will make sounds like, 

"TDOK TDOK TDOK!!" 

You will not be a happy camper. 

The mixing method doesn't matter when dealing with butter that needs to be softened, be it electrical mixer, hand mixer, or wooden spoon. To facilitate the baking process, you need to follow the rules of the recipe and have the ingredients in their proper state. And according to my book... butter can not be melted to hold fine air bubbles and incorporate with other ingredients. Butter is a one-time form ingredient. Once it's melted, you can't freeze it back to its original state. 

In some recipes, there are calls for room-temperature eggs. This at first came very strange to me. I thought, "Why do eggs need to be warm? There's nothing special about them!" Apparently, room temperature eggs incorporate into batter more quickly than cold eggs. But, can cold eggs be as problematic as cold butter? An experiment was conducted. One cake was made with cold eggs, and the other with room temperature eggs. They were both normal yellow cakes. In the process of making the cold-egg cake, the batter was slightly thicker and took five minutes longer to bake. The warm-egg cake resulted as having a slightly finer and more even crumb than the cold-egg cake. However, that was the only difference between the two, and no other difference was detected by the tasters. So in most basic cakes, eggs any temperature are fine. 

(Another thing to note: The cold-egg cake's batter was more thick, therefore causing the baking process to be longer because the ingredients weren't melted or warmed evenly. The cake resulted as dense.)

BUT, in certain cakes, eggs need to be warm. Certain cakes such as the complicated ones, which include angel food, chiffon, and pound cake. Chiffon is light and airy. 

Why? 

Because the egg whites are beat to stiff peaks. Stiff peaks make the cake airy, light, and fluffy. When egg whites are beaten for a long time, they go from translucent yellow to soft white. And when beat harder, the egg whites become a little hard. Wondered why meringue cookies are white, airy, and light? 

They're white, first of all, because they are made with egg whites. 
 Second of all, they are airy because you are beating a lot of air into the egg whites when you beat them. 
Lastly, meringues are light because things full of air are light. For example, balloons!

Here's a video on Easy Egg White Separation:


Source(s):
http://www.americastestkitchenfeed.com/cooking-science/2013/09/do-cold-eggs-ruin-baked-goods/
Corriher, Shirley O. BakeWise. Page 122.


WHEN YOU SEPARATE EGG YOLK AND WHITE, DO YOU NEED TO LET THE EGGS COME TO ROOM TEMPERATURE FIRST BEFORE SEPARATING? WHY OR WHY NOT?

a. To begin with, I must tell you that I hate questions with a 'why or why not' attachment.

b. To answer the question... hrm. Let me look into that.

Apparently, cold eggs are easier to separate than eggs at room temperature. Surprisingly though, room temperature egg whites are easier to beat. This is because the egg keeps itself together more  when cold and the yolk doesn't break as easily. 

Now, I think this is so because in cold things, the molecules keep close together and don't move a lot. Whereas in hot things, molecules are on the move.

I think that's logical.

However, since it is easier to beat egg whites from room-temperature eggs, you can either let your eggs get warm before you separate, or let the whites reach room temperature after the separation. It all depends on your preference. I think I'd choose to let my eggs reach room temperature first, because beating is tiring.

Source(s): 
http://m.joyofbaking.com/ingredients/Eggs.html
http://www.thejoykitchen.com/ingredients-techniques/separating-eggs
http://www.simplyrecipes.com/recipes/how_to_separate_eggs/ 


WHY DOES THE OVEN NEED TO BE PREHEATED?

Well, what else will you cook your cake in? The sun? A solar oven? Your armpits? *dry laughter*
Before I use my research, I think it's necessary to preheat the oven before everything because some ingredients melt or spoil quickly. If you're making sugar cookies (the kind where you have to freeze a log) you'd better preheat the oven first thing. Sugar melts easily. You know, cotton candy is just colored and flavored spun sugar. That's why it melts so easily when it touches your saliva, your perspiration, or anything wet. Even... [censored text]

LOL JK

Also, it's good to be prepared, which is obvious. 

If you are on a baking show and you want to look like a pro, preheat the oven first. LOL, can you imagine a baker preheating the oven after everything and the cake or whatever he's making turns out to have sunk or burned? Imagine the baker saying, "Oh, no," (dramatically, since all cooks, bakers, and chefs are dramatic) and then covering the camera, screaming, "CUUUUT! Don't put me on TV!" 

LOL #bigtimeepicfail

Now, according to my research, your oven has to be preheated, or your goodies won't rise as you want them to. Also, you know how you have to melt butter sometimes, at medium heat? Sometimes I think, "Can't I just melt it on HIGH heat?!"

One time I was stirring something, or cooking something in the kitchen, and I was impatient. I asked my sister, "Can't I cook it on high heat, to make it melt faster?"

She looked at me through her half-frame glasses, a wise but rather frustrated expression on her face. "No. If the heat is too high, it might burn. It has to cook gradually."

Although she said it in her angry voice, I realized her wisdom. 

I guess that's why when you defrost things, you have to put them in cold water, not hot water right away. And when you come in from the snow outside in winter, you dip your toes in cold water. I one time came inside from playing in the snow, and I filled the bathtub with hot water. I dipped my toes in, and they began to hurt. 

SOOOOOO, it's better not to go into extremities. #patience

Source(s):
http://theboatgalley.com/preheat-oven/


Well, thanks for reading and happy eating!

-N-

Monday, May 26, 2014

Everyday Chocolate Cake: Attempt Alone #1

Everyday Chocolate Cake, made entirely by moi. Dig in!
Today I made Everyday Chocolate Cake by myself! I made it two weeks ago with my sister. It was crumbly, chocolatey, and delicioso. It was mi precioso. If I picked it up and hugged it, it would look like rich soil before I even started hugging it.


Anyway.


This time, the cake was more dense. And when I test-pressed it to check for readiness, the dents STAYED. And I didn't even press that hard. I felt so evil rejected.

I guessed the cake was dense because I possibly overmixed the batter. The recipe said to not overmix. I rebelled. But I just love mixing things together, okay?

Those dents though.


Also, I didn't put wax paper in the cake pan. I greased it with the leftover butter wrapper. Then I floured it. My school's founder, manager, and principal mom showed me the proper way to flour a greased pan. All the corners were not greased. So I greased my finger and rubbed the corners, then floured them. It looked like it would work. But it didn't. I mean, check this out, and then laugh.

Those fingers are my brother's fingers.

And... what else. Well. The cake tasted okay, smelled okay, and looked okay. Oh yeah! I had slight trouble getting it out of the pan!

Wise Ol' Mum said, "With parchment paper you can just pull it out of the pan."

I pondered over her statement. The gears in my mind whirred. "Would wax paper work too? Or would it burn in the oven?"

Mother the Non-Moth said, "No, no... it won't burn... ahh..."

I forgot what she said after that. Anyways, I did PHOTO CHUTES SHOOTS! My brother, who I shall call Monsieur Orange Singlet, photobombed my photoshoots. I didn't want him hanign around uselessly, so I told him to take some pictures. They were horridly blurry. Typical? (Like mind like pictures. Lol, jk.)

SO.

I think that's all......

WAIT IT ISN'T

Look at these to complete your day.

Top view. I told Mum, "You have to take it from different angles, y'know?"


I didn't know what those white/yellow things were. I JUST figured out that it is most likely the flour from the pan. *facepalm* Why am I so dense. Well, like cake like baker I guess.
The amazing cuttingness. Photo courtesy of Monsieur Orange Singlet.


Ciao and happy eating. Just try not to get constipation or the opposite of that.

-N-

THE RECIPE...

Oven: 325°F
Baking Duration: 1h 10m

INGREDIENTS
  • 1/2 cup unsalted butter
  • 1 cup firmly packed light brown sugar (when you buy it, pack it safely and hardly among all the other groceries. cereal boxes are best.)
  •  1/2 cup regular sugar
  • 1 egg, at room temperature
  • 1 cup buttermilk (= 4 TBS buttermilk and 1 cup of water)
  • 1 1/2 cups flour
  • 3/4 cup cocoa powder
  • 1/4 tsp baking soda
  • 1/2 tsp baking powder
  • 1/4 tsp salt
DIRECTIONS
  1. Preheat your oven.
  2. Butter and lightly flour a 9 x 5 x 3" loaf pan, or line it with parchment/wax paper.
  3. Cream the butter until it is smooth. Add the sugars and beat until the mixture is fluffy.
  4. Add the egg and beat well, then add the buttermilk. 
  5. Sift the flour, cocoa, baking soda, baking powder, and salt in the wet ingredients.
  6. Stir until well blended and don't overmix. Because I didn't.
  7. Pour the batter in a loaf pan. Bake for 60-70 minutes.
  8. Om nom nom.